As part of my work toward an upcoming post about a lost piece of very obscure Mac history that has finally been found, I’ve been playing around with old Apple-branded SCSI hard drives made by Quantum and Conner in the 1990s. What I’m about to describe is already common knowledge in the vintage computing world, but I thought it would be fun to share my take on it anyway.
What I’m talking about is how a lot of these hard drives just refuse to work anymore. This is very common with old Quantum ProDrive models, like the LPS or the ELS. The drive spins up, you don’t hear the expected pattern of click sounds at startup, and then after a few seconds, it spins back down.
This Conner CP30175E drive has a similar problem, but it tries over and over again, playing a tone through the voice coil (I think) in between attempts.
These particular hard drives shown in the videos are both about 160 MB in capacity and were commonly used in computers during the early-to-mid 1990s. You can see they have Apple stickers, so they are definitely stock drives originally from a Mac. At least in the case of Quantum, there are a bunch of different capacities all affected by this same problem, ranging from 40 MB to 500 MB. Maybe even more than that — those are just the ones I’m aware of. I’m less familiar with Conner, but I wouldn’t be surprised if they similarly had a whole family of affected drives.
What’s causing this issue? Let’s open them up and find out.
There’s a common misconception in the computer world that as soon as you open a hard drive and expose it to a single particle of dust, you’ve completely destroyed it and it will never work again. Now to be fair, with many modern, higher-density drives it’s probably true — some of them are even sealed with helium inside — but older hard drives like the ones I’ve shown above are remarkably tolerant of being opened. That’s not to say I would leave it operating without the cover for an extended period of time, but for quick data recovery purposes in a decently clean environment, it’s fine.
Anyway, with the cover off, let’s take a look at what the drive is doing:
The platters spin up, but the head doesn’t move at all. Here are a few attempts at gently moving the head by hand with the drive powered off, and then powering it on. Would this fix it?
Nope, it didn’t. The head would always just immediately go directly back to the center. Note that I had to unlatch the head before I could move it. That’s what I was pointing out with the screwdriver. This is due to Quantum’s patented technology (long expired) known as AIRLOCK, which automatically keeps the head stack latched in place near the spindle until the drive spins up. The purpose is to keep the head away from actual data on the platters when the drive is powered off, in case it is jolted. I circumvented the AIRLOCK functionality to see if starting out with the head away from the center of the platters would fix the problem, but obviously as you saw in the video, it didn’t.
Many years ago, techknight shared his solution for bypassing this problem. The temporary fix ended up being to manually move the head just like I did before, but it had to be after the platters were already spinning and the latch was free. Some people have needed to manually release the latch because the airflow isn’t good enough when the cover is off. I did not experience that issue — you can see it open up on its own just before I start moving the head:
Ah yes, after the head was freed, you got to hear the familiar click pattern that Quantum hard drives make as they’re running their seek test or calibration or whatever it is. That sound is still ingrained in my head after all these years as a little “startup click” that old computers make.
After the drive was working properly, my ZuluSCSI immediately began dumping the contents using initiator mode — a super cool feature it provides, which is also available in the BlueSCSI v2 firmware fork. Normally these awesome SCSI emulator products are used as hard drive replacements, but initiator mode allows you to use them to connect to a physical drive (even a CD-ROM drive) and save the contents to an SD card — great for software preservation purposes!
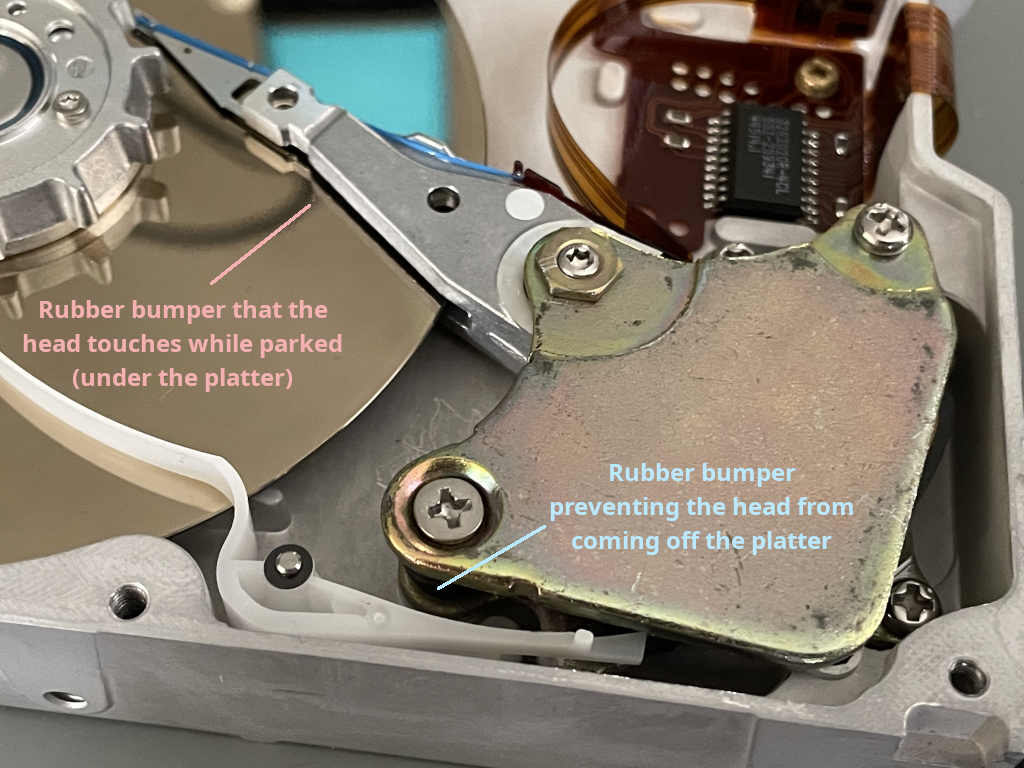
Back to the “spinning up and right back down” problem, though: what causes it? Why did I have to manually move the head in order to make the drive start working? At the time of techknight’s video, the underlying cause wasn’t as well-known as it is now, but the culprit is a rubber bumper that slowly disintegrates into goo over the years. There are actually two bumpers that both get sticky — one at each extent of the head’s movement. The really troublesome bumper is the one that the head rests against while parked, toward the center of the platter. The other one prevents the head from falling off the outer edge of the platter.
The voice coil motor controlling the head isn’t strong enough to overcome this sticky rubber, so the head just sits there until the drive’s firmware gives up on trying and spins the platter down.
On some older Quantum drives, both of the rubber bumpers can easily be reached by removing the top magnet that is over the head, so theoretically you could replace them with new rubber tubing with the correct inner and outer diameter. On “newer” drives like this one, only the outer bumper is accessible by removing the magnet, which isn’t much help because that’s not the bumper that causes the problem.
Instead, the problematic bumper that the head sticks to while parked is actually under the platter, making replacement much less feasible. Here’s a view from my endoscope:
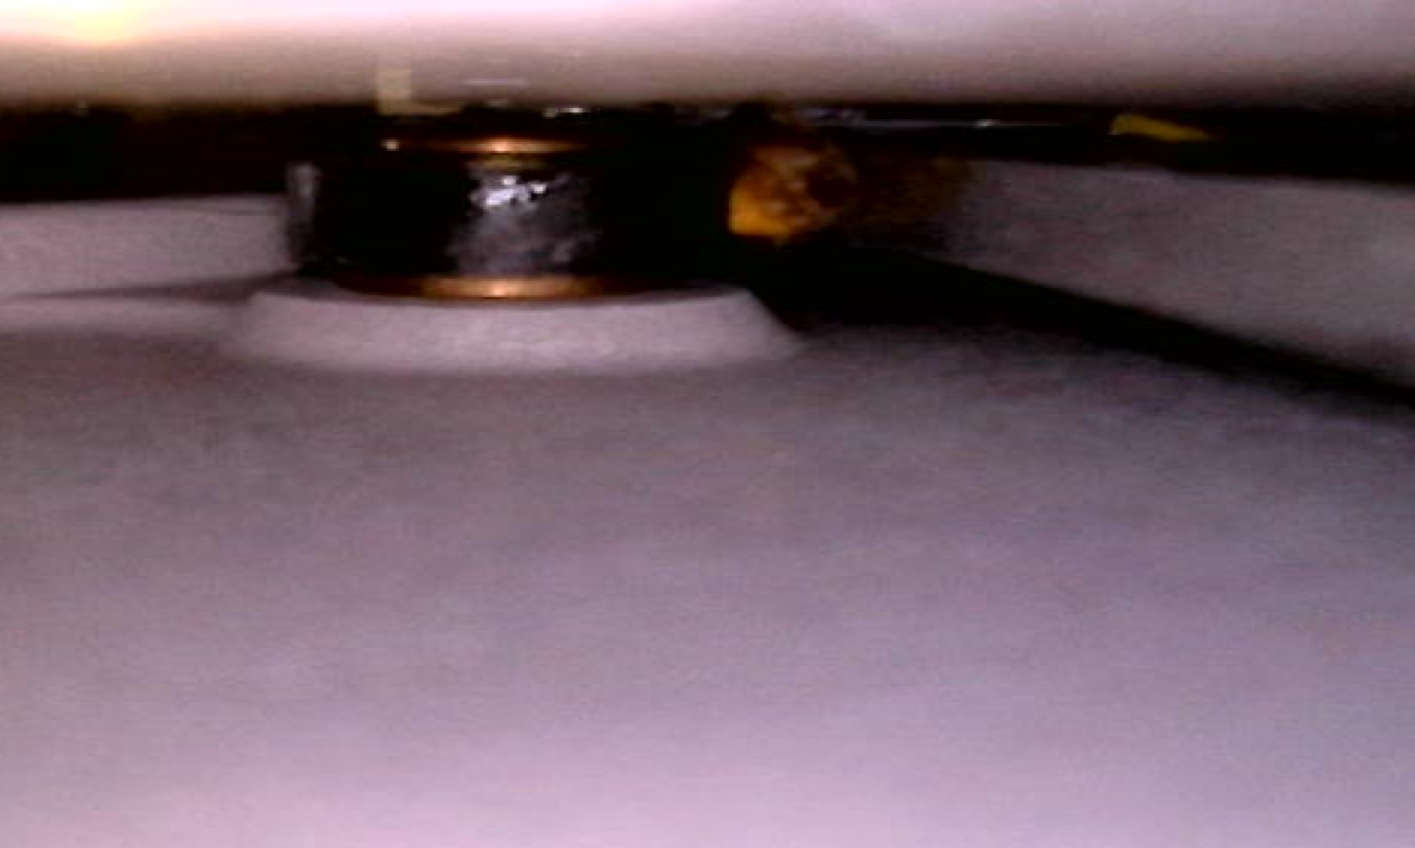
At the top of the image is the platter. The bottom is the hard drive enclosure. On the right side, you can see the head resting against the bumper. I stuck some Kapton tape in there while I was playing with it and had the platter off, so that’s what the orange color is. Note that I switched to a different single-platter ProDrive LPS model for those last two pictures, but it has the exact same arrangement internally as the drive shown in the videos.
There is one solution readily available on eBay: a plastic insert that prevents the head from hitting the bumper. I don’t have any experience with this fix, but it has a bunch of positive reviews. You can find it by searching eBay for “Quantum ProDrive ELS Repair Insert”. If you’re looking for a long-term solution, that might be the way to go. It’s theoretically possible to remove the platter(s) to get to the bumper and replace it, but it’s a lot of work and very risky — especially on multi-platter drives where the platters have to stay in alignment with each other.
If your ultimate goal is just to get the data off of the drive, I have had a bunch of success with the simple method I showed of manually unsticking the head after the drive is totally spun up. Thanks to techknight for originally posting his very helpful video on this process!
Next, let’s move onto the Conner drive. There is not quite as much information on the internet about these. How did it behave with the cover removed?
I jumped the gun a bit in the video by not showing how it behaves without any intervention from my hand, but it’s the same problem. The head doesn’t move at all. I tried manually moving the head in the same way I was able to get the Quantum drive working, but the Conner drive just didn’t want to cooperate with me. Here’s a closer view where you can see the problem. First, here’s how it looks with the head parked:

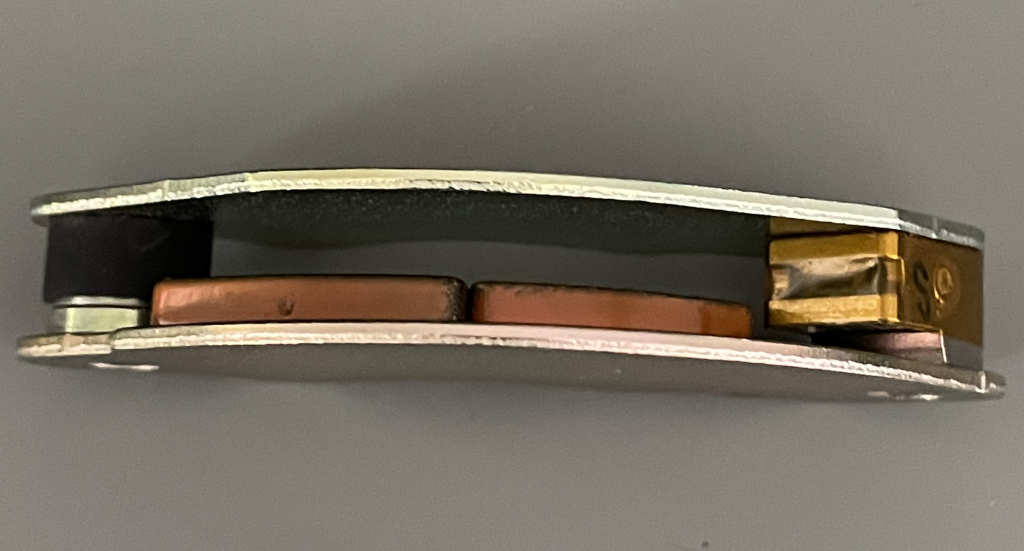
And here’s how it looks after I move the head toward the outside of the platter, away from the parked position:
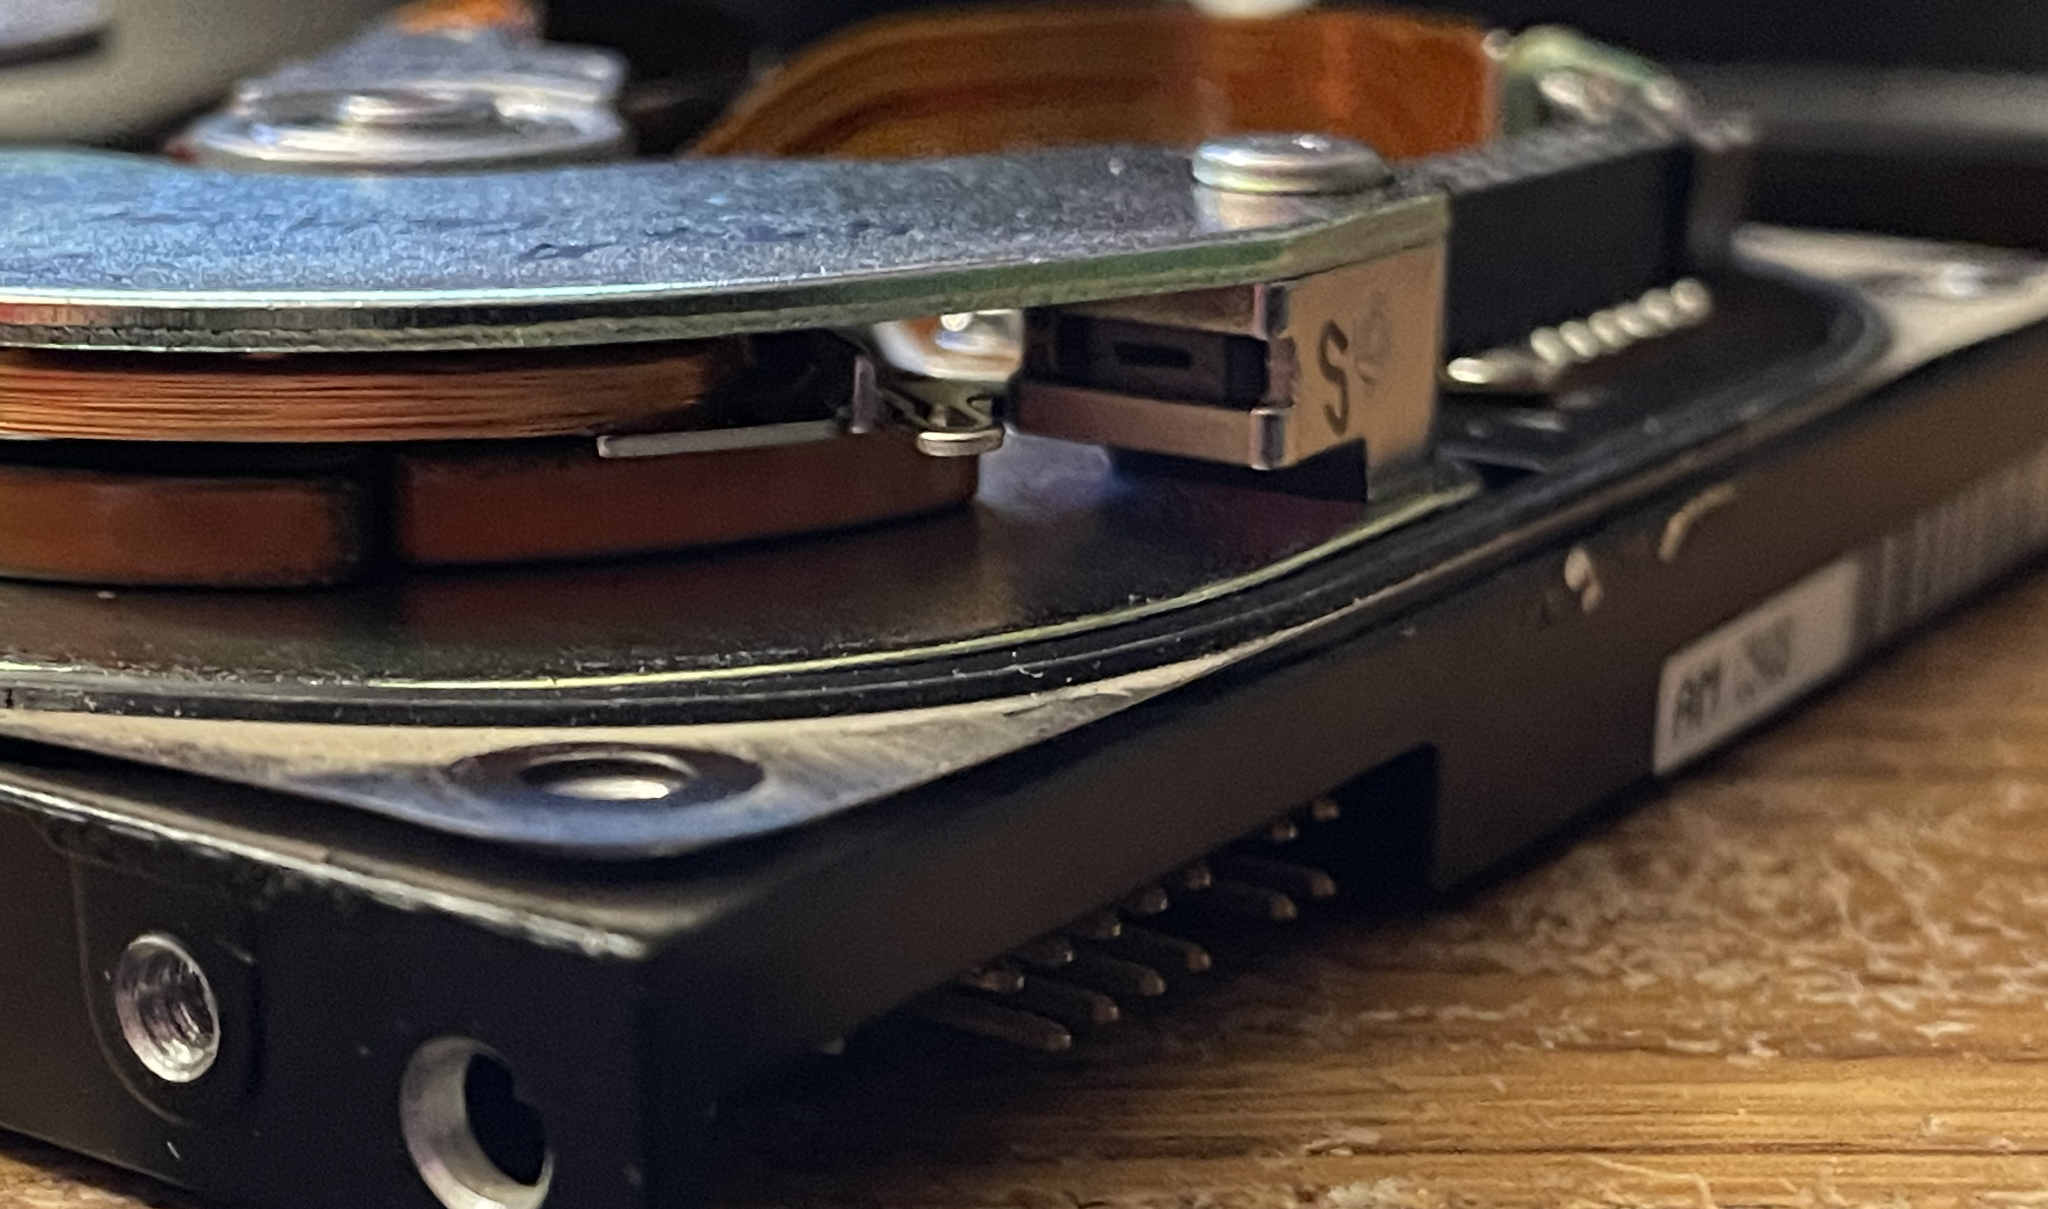
I don’t think there’s supposed to be an indentation in the dark piece where the head assembly touches it. It seems to be grabbing fairly tightly and preventing the head from moving away. The grip seems pretty strong here, though — I get the feeling this drive may be using another mechanism for intentionally keeping the head parked when it wants to, like something magnetic. I’m not 100% sure. I’m pretty sure that either way, the hole in the dark piece is not supposed to be there, though.
On this Conner drive, I was running out of ideas. It’s not mine — someone very kindly loaned it to me with a “no worries, it doesn’t work anyway” type of reassurance that I could tinker with it and try to recover data from it as part of my search. I was really desperate to inspect the data on it because it came from a Mac model that I knew could potentially contain the lost software I was looking for, but I just couldn’t get it to work.
I was about to give up and send it back, but then I randomly decided to hold a folded-over piece of Kapton tape in the way so that the head couldn’t move all the way back to the position where it would get stuck. This was the magic solution I needed in order to get this drive operational. As soon as I did that and powered it on, the drive performed its startup click pattern and then the ZuluSCSI immediately began dumping the drive:
I think this Conner drive is simply more picky about the timing of unsticking the head. I’m still performing essentially the same temporary fix that works with the Quantum drive, but I’m physically holding it back from ever getting stuck. Due to the way the platters stick up on this model, I was too afraid to put the cover back on right away, so I allowed the entire drive to dump with the cover removed. All the data read back perfectly.
I believe I have figured out somewhat of a permanent fix for this drive by adhering a piece of Kapton tape as shown below:
To be honest, after all of the research I’ve done for this post, I’m concerned that this solution may be leaving the head in a vulnerable position when everything is powered off. When the platter spins down, the head doesn’t push itself up against the tape, so it may be resting over a spot on the platter where data is actually stored. I ended up buying another identical drive with the exact same problem, so I might perform some further experimentation with alternative solutions. Maybe if I only wrap the Kapton tape around the dark thing with the indentation (is it rubber?) rather than the entire metal enclosure, the head will still park properly but not get stuck. I’m not sure.
Regardless of whether my fix was correct, the exciting thing about this drive is that it ended up containing the long-lost information I was looking for, so this whole project was a huge success. An upcoming post will go into detail about the Apple factory-programmed data I was able to locate and preserve. This Conner drive has since been returned to its owner, and is confirmed to still be working in the original machine it came from. So not only did I recover the lost data, but I was even able to return the drive to working order so it could be reunited with the computer it was bundled in over 30 years ago.
I think this is a good reminder that we shouldn’t trust hard drives for long-term storage. Even if a drive is kept in pristine condition, there are components inside that might be aging in ways you would never begin to imagine. Keep multiple backups of any important data, and make sure you copy those backups onto a newer storage medium as the decades go by and technology evolves. Don’t rely on a 30-year-old hard drive still working 30 years later.
Anyway, I hope this post was interesting and educational. I thought it was fun to take the cover off and see how these hard drives operate. I have used both of these data recovery strategies on multiple Quantum and Conner hard drives and have experienced a whole bunch of success. As long as the head is just stuck in the parked position and there hasn’t been anything catastrophic like a head crash, these tricks definitely work for getting your data back. Would it be smart to open up a drive that’s fully functional? Probably not. For example, I own two Apple-marked IBM drives from the same era, and they both work great, so I’m not going to open them up to check for any rubber. But if your drive isn’t working and you have nothing to lose, why not give it a shot?
I’ll leave you with one fun tidbit I picked up while working on these hard drives. If you’ve ever wondered about the arrangement in terms of how the data is physically stored on the platters, I think I have an answer, at least on these Quantum and Conner drives. As I dumped the entire content of a 2-platter drive, the head stack started at the outside and slowly made its way toward the center. Then, a quarter of the way through the dump, it immediately jumped all the way back to the outside of the platter and continued reading inward again. It happened again at the halfway mark and once more at 3/4. This makes total sense because there are 4 total sides that can contain data. So each platter-side contains one consecutive chunk of data on the drive, and the data is stored outside to inside. How’s that for useless trivia?
Stay tuned for my post about what I actually recovered from that Conner drive!


Regarding the jumps back, this is done to average out the data rates. Manufacturers bin the heads and platters by data density.
As the heads move from outside to inside the data rates will decrease. By laying out the logical tracks in a serpentine pattern of N tracks of width you can average the data rates across the heads of different densities, smoothing the data rate transitions across the whole of the drive.
Perhaps these are older drives? The ones I worked on around 2004 were using a serpentine of say 32 or 64 tracks, or perhaps across a whole zone of tracks, but far less than say half of the drive.
Thanks for sharing this Doug- it was fascinating to read about, and I’d definitely heard about the hard drive opening thing in the past.
Thanks for your comment, Chris! Yeah, these drives are marked as having firmware from 1992 and 1993, so the arrangement probably got way more complicated as time went on.
Thank you Steve!
It’s interesting to me how many people have reinvented this fix – you’re at least the second. I figured it out a couple of years ago while I was trying to recover the data from a bunch of Acorn Archimedes drives (Acorn were big fans of Conner drives for some reason).
I’m surprised Quantum put a bumper on the spindle – that’s wild, but they always did things a little differently.
I can’t wait to see what you recovered from the drive – sounds interesting!
I have a couple of Rodime drives but they’re going to need the servo / stepper motor “pulling” to offset the heads. They’re old dedicated-servo drives and the heads go out of position (relative to the servo head) over time, making the data unreadable by normal means.
Haha, that’s good to know, Phil! I figured someone must have run into the same thing. I’m definitely not entirely sure what the root problem is on the Conner drives — it still somewhat feels like there’s magnetism involved when I move the head — but the temporary fix works at least.
techknight also pointed out in another video that when Conner drives are stored on their side, the gasket can turn to goo over time and drip onto the platters. That would probably be harder to recover from. So that might be another piece to replace in a drive that’s otherwise working.
To be clear, the bad Quantum bumper isn’t on the spindle. But it’s definitely in a really annoying position under the platter that’s impossible to reach without removing it.
Oh wow, that problem on the Rodime drives sounds very difficult to deal with! I’d love to see the process you end up following on them.
Coincidentally, I just pulled a Quantum ELS 160 (170) from a Classic II I’m restoring. It ran connected externally to another machine and I was able to save its contents. I then ran a random seek test to check it out .. it passed but it subsequently failed to mount. 8-(
I opened it up and it doesn’t appear to be suffering the gooey rubber death. Instead, it’s showing the symptoms of a corrupted ROM. It has an EEPROM labeled Apple Y4200 but System Profiler is seeing nonsense device data. Sadly, I can’t find a dump of this 1992 ROM anywhere to reflash it.
Any insights?
Hi Doug, about a year ago I took some pictures of a Quantum drive with the same problem, but to be honest I didn’t even try to fix it. I was just curios to know why it stopped working.
Here you can clearly see the melted rings:
https://www.oldcomputr.com/80mb-scsi-quantum-hard-drive-with-melted-rubber-rings/
Hey Chris, I think Bitsavers might have a dump of what you’re looking for. Check this out:
https://bitsavers.org/pdf/quantum/ProDrive/ProDrive_ELS_160_Apple/
I also have a different Quantum drive that looks just like that one with the Y4200 sticker. The Quantum drive shown above in this blog, for anyone interested, has a ROM with a Y4300 sticker.
It does seem unlikely to me that the ROM would suddenly go bad, but you never know!
Giacomo, thank you so much for sharing your pictures! Those are fantastic views of both pieces of melted rubber that I was talking about. I wish I had taken a picture under the platter when I had mine apart.
Doug, thanks muchly for the Bitsavers link, I’d overlooked that handy site.
The picture in that spot is indeed my drive. The ROM dump is 32kB and it’s exactly the second half of what I read from my 64k ROM chip (type NM27C512V150). I think this is “diskware” portion. The first 32kB looks kinda OK with a copyright and so forth .. there’s no obvious massive corruption.
Scanning through a doc entitled “19921120_FLASH_Firmware_Manual.pdf” from that site, I think what may have happened to my drive is that random seek/write test commands may have corrupted the drive parameters. But I don’t know where this data stored and or how to reset it. Ho hum.
Ah, that’s an interesting PDF you found Chris! I hadn’t noticed that one.
If it’s any help, I’d be happy to dump the entire chip from my drive with the Y4200 sticker and share it with you.
Yes, thanks, it would be great if you could dump the entire 64kB. I’m hoping that the first part of the ROM may contain the device parameters that I’ve lost.
The controller responds over SCSI on the correct ID but the nonsense parameters cause the OS (be it MacOS, OSX or Linux) to ignore the drive and report it as unknown or not present.
Interesting! The only thing that makes me think that it might not be holding actual settings is that it’s a UV-erasable EPROM. I guess they could have reserved a section of unprogrammed space that they kept filling up as settings changed though. Here’s my dump (the second half is a perfect match against Bitsavers’ dump too):
https://downtowndougbrown.com/Y4200-FullDump160.bin
That PDF you found is super interesting with some of the commands that it talks about relating to the servo tracks. It makes me wonder if the drive itself is responsible for writing them initially rather than some expensive external equipment. I’m definitely not fully understanding everything they’re discussing in that document though, that’s for sure. I might be totally confused. The more I think about it and research, the more I’m convinced I probably am confused.
Thanks for the dump, Doug. My ROM is identical so corruption is not my problem. I was also wondering whether, since it’s electrically programmable, the drive parameters were written there too .. but obviously this isn’t correct.
It looks like l’ll need to code something up to write the parameters to the controller. The PDF covers this. I haven’t delved as deep as you into servo track details though!
My very first PC had a 420mb Conner. It came in a top of the line, at the time, 486dx2/66 and 4mb Ram. That wasn’t the largest Conner offered at the time but just one or two sizes down. Thing lasted for ages too.
Thanks for sharing this and stirring those nostalgic cobwebs awake.
If you ever end up figuring out how to get it working again, I’d definitely be interested in hearing about it, Chris.
Glad you enjoyed it, speerfissure!