Earlier this year, there was some drama around the shutdown of the Nintendo Wii U’s online gaming. Team 0% had a goal of making sure that every level created in Super Mario Maker was beaten at least once. If you’re not familiar with Mario Maker, it’s a video game that lets you make your own levels in the style of several classic Mario titles and share them with the rest of the world to play. Well, it did until new uploads were disabled in 2021. By that point in time, the sequel Super Mario Maker 2 had come out on the Switch and that’s where most people were creating their levels.
The clock was ticking for Nintendo’s servers and Team 0% was so close to their goal. Eventually what it came down to was a single uncleared level: Trimming the Herbs by Ahoyo. As you can see in the video, it only takes about 15 seconds to beat. But in order to win, you have to do some crazy, precise tricks that casual players like me simply can’t do.
Some of the most talented Super Mario Maker players in the world were focused on trying to finish it before the April 8th cutoff, including sanyx91smm2, Thabeast721, and LilKirbs. It was very, very difficult. People started wondering if cheating was involved. In order to upload a level to Nintendo’s servers, you have to beat it yourself first. This serves as a way to ensure that impossible levels can’t be uploaded (although some cruel people use glitches or hidden blocks to still upload “impossible” levels).
I’m not really much of a gamer these days, but this story caught my eye at the time and inspired me to do some hardware tinkering with my own Wii U.
There isn’t a purpose for me to retell the entire saga from March and April in detail because it has already been covered in depth by Ars Technica (1, 2, 3), but as a quick summary, Ahoyo admitted that he had uploaded the level by clearing it using a custom hardware mod to perfectly play back the correct button presses. This meant that Trimming the Herbs had been uploaded as a tool-assisted speedrun (TAS), so Team 0% excluded the level from their project. Either way, Sanyx was eventually able to legitimately beat the level on April 5th, just a few days before the shutdown.
Why am I writing about this now? There are two reasons. I’ve been doing further research into Wii U TAS playback, and I also wanted to talk about my small involvement in this story now that things have calmed down. When Sanyx finally beat the level, there were several other people below already marked as having done so:
But Trimming the Herbs was uncleared prior to Sanyx’s clear, right? Well then, why were there a bunch of people marked as clearing it before Sanyx in this screenshot? There’s a simple explanation. Hackers figured out ways to cheat and instantly beat the level. Notice how the world record is 0.014 seconds in the screenshot above? Yeah, there’s no way to actually do it that quickly. It was like they somehow warped themselves directly to the goal.
You may notice there’s a Doug from the United States in the list directly below Sanyx. That’s me! My name is highlighted because this screenshot was taken while I was viewing it from my own Wii U prior to Nintendo’s server shutdown. You can see my Mii in the upper-left corner of the screen as well.
So did I hack my own clear of Trimming the Herbs too? Kind of. Let me explain.
If you like YouTube videos, I made a quick 8-minute video a while ago explaining what I did. You might enjoy it. Either way, I’d recommend that you keep reading because I have recently done some additional interesting research that the video doesn’t cover.
Even before Ahoyo admitted that the level was beaten by a TAS, I was already thinking about how it might be possible to rig up a microcontroller to do perfect button presses — a solution similar to the replay devices associated with TASBot. I am completely new to the world of TASes, by the way. I have no past connections with the Mario Maker, speedrunning, or TASBot communities. I’ve always been mesmerized by the incredible things they accomplish, but this was all a new experience. I just decided to buy a used Wii Classic Controller and open it up to see how it worked. By the time the controller arrived, the news had come out that it was a TAS. I was ready to experiment.
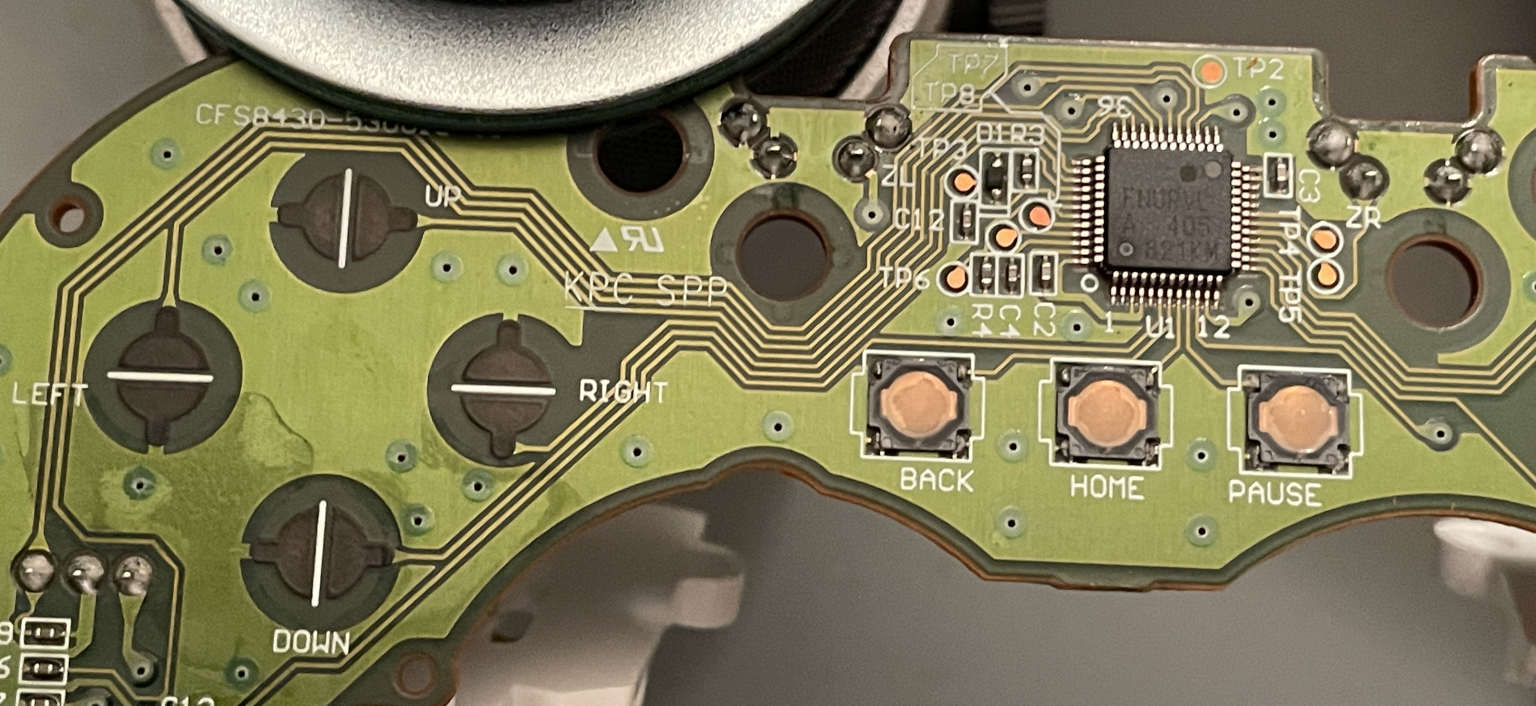
It’s really simple. There’s a microcontroller in the middle of the board (U1) and a bunch of traces coming out of it. I have no idea which MCU it is or who made it. It very well could be something custom designed just for Nintendo. Anyway, if you look at the little pads for each of the up/down/left/right buttons, one side goes to a ground plane and the other side is a trace that you can follow to one of the MCU pins.
When you press one of the membrane buttons, it is connecting the two sides together. That’s it. I just needed a way to drive the corresponding microcontroller pins to ground when I wanted to press them, and leave them floating the rest of the time. In the GPIO world, that’s pretty much the definition of an open-drain output.
That’s exactly what I did. I figured out how many different buttons I would need to be able to control, traced them to the correct pins on the chip, and soldered a bunch of wires to those pins. The buttons I determined to be necessary were the four directional buttons I already mentioned, A, Y, and one of the top buttons for doing a spin jump. That control scheme is a tad bit different from the Super Mario World I grew up with on the SNES. I probably could have done this more cleanly by destroying the actual button pads and soldering to them, but I really wanted to make my modification temporary so I could restore the controller back to its original condition afterward.
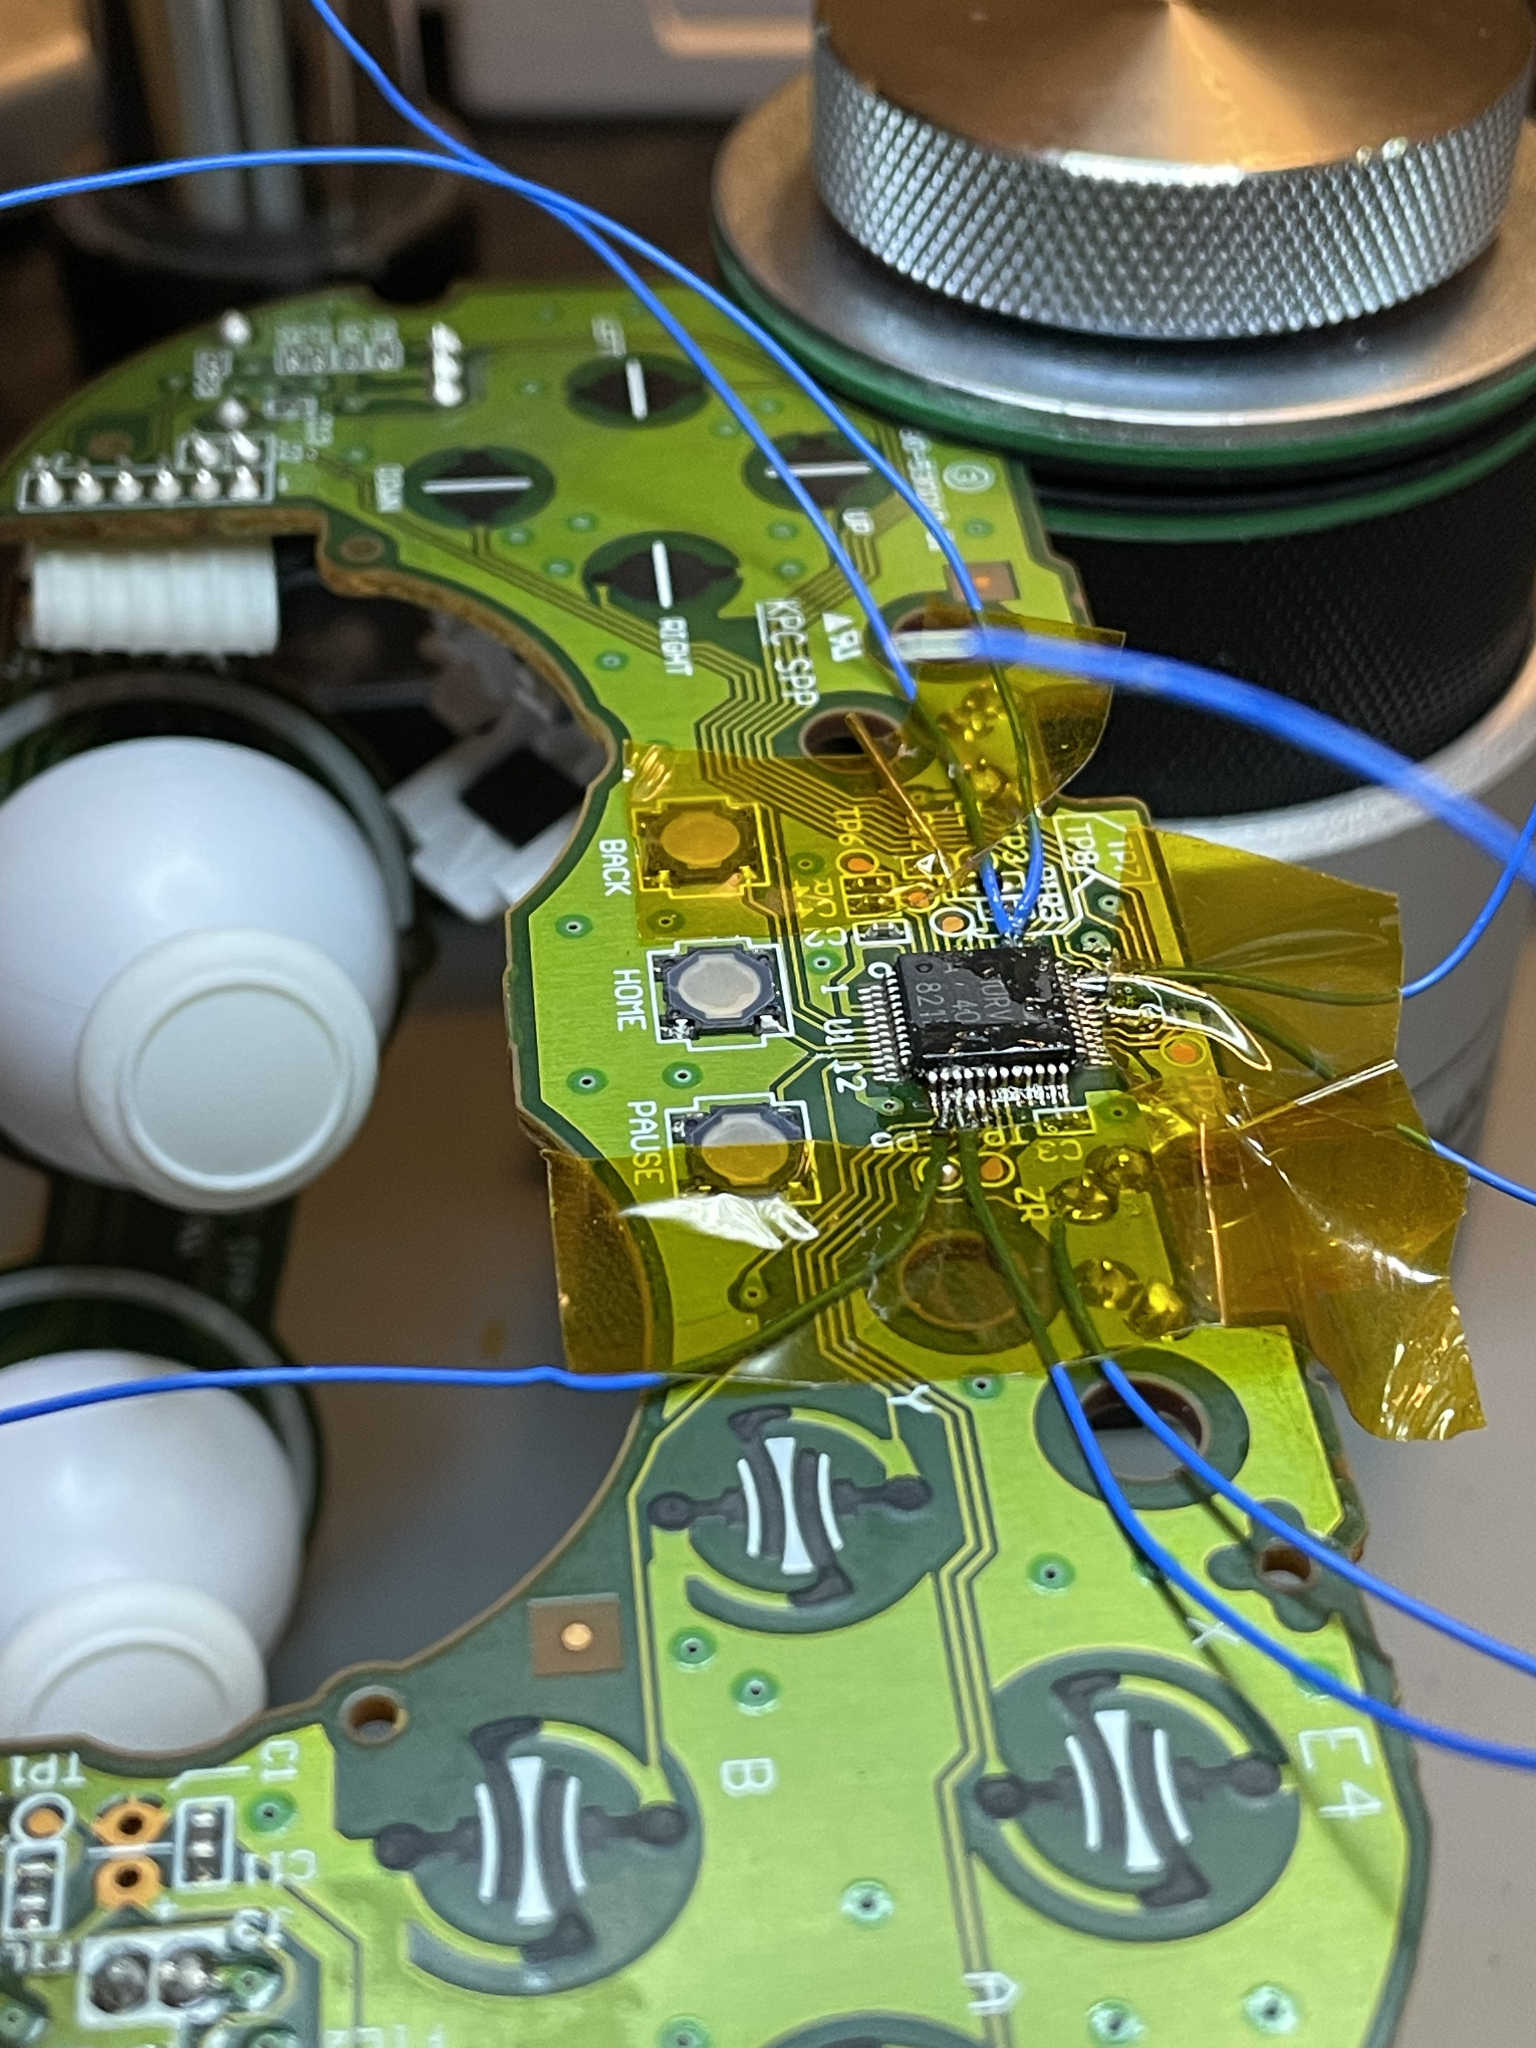
This soldering was actually pretty difficult for me. The pins are small and close together. I ended up bending a couple of pins but I was able to make it work. It’s difficult to heat up one pin without disturbing the wire you’ve just soldered right next to it. It ended up being really good practice for me. Even if this looks like a huge mess, I think it was a valuable personal soldering lesson.
With all these wires soldered in, as well as a ground wire which I added later, I was ready to set up something to be hooked up to the other side of the wires in order to control them. Of course, as I’ve been doing so much lately, I opted to use a Raspberry Pi Pico:
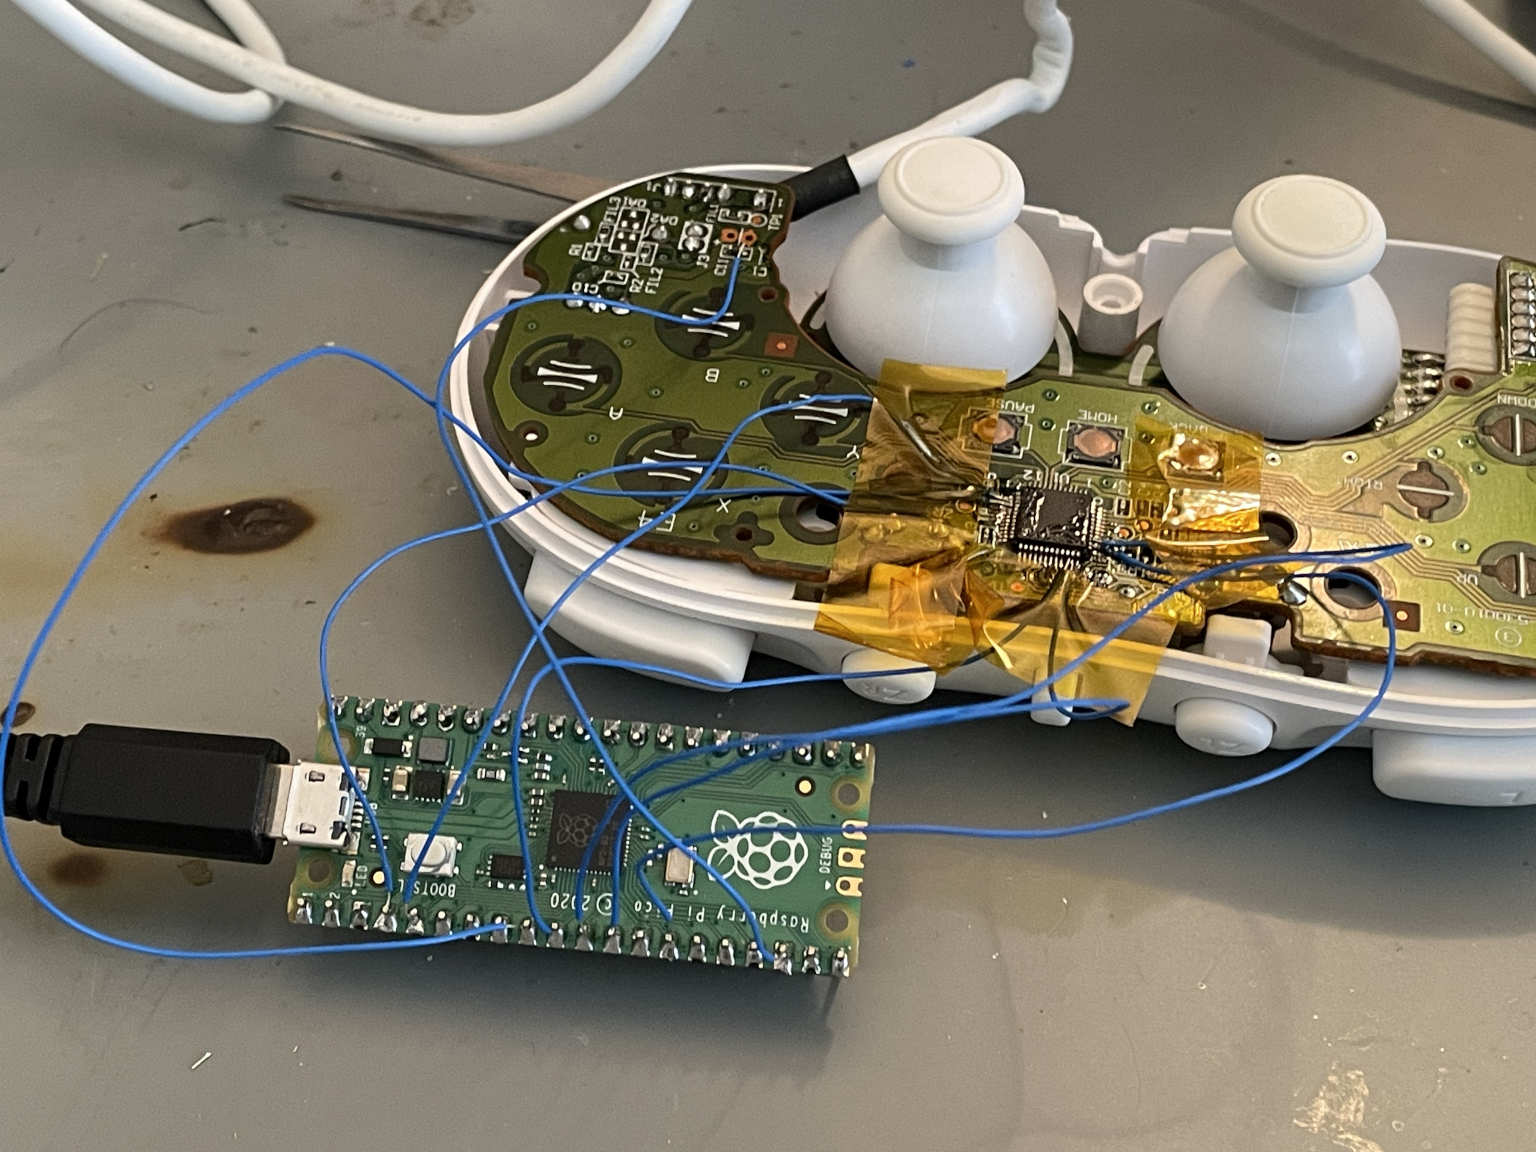
Don’t mind the burn mark on my mat. That’s another lesson I learned about using too much heat with my hot air station when unsuccessfully trying to replace the USB connector on an Amazon Fire tablet for a family member. I guess they live up to their name!
Now I was ready to write some code and see if I could make it work. I started out simple inside of MicroPython.
from machine import Pin
import utime

BTN_A = 6

button = Pin(BTN_A, Pin.OPEN_DRAIN, pull=None)

button.value(0)
utime.sleep_ms(100)
button.value(1)
I could run this code, and Mario would jump. Success!
Well, sort of. I built up a quick little 60 Hz timer and a simple “TAS engine” that counted frames and decided when to press buttons. Then I programmed some small sequences of inputs to send to the controller. I noticed that I would get slightly varying results. The whole point of a TAS is so that it will be repeatable, but this solution didn’t seem to be able to do even simple button presses consistently.
I completely ignored that problem and continued on, trying to come up with a set of inputs that could allow Mario to beat the level. I (incorrectly) thought that maybe the timing wouldn’t matter if I was off by a frame or two. I also want to add that I wasn’t trying to beat anyone to the solution or win any prizes — I just wanted to solve a fun technical problem.
This was the point where I learned my first important lesson about tool-assisted speedruns: they are not easy to create! Somehow I pictured in my head that the soldering and hardware stuff would be the hard part, and then I would just magically write the code to make Mario beat the level. Being a firmware engineer, I really should have known better.
The hardware stuff ended up being the easy part, at least for me. The difficult part is actually figuring out which buttons to press, and when! The longer your TAS goes on, the harder it’s going to be to get the button presses just right. That’s why it’s very useful to have tools that allow you to go back and rewind frame by frame. I believe this kind of technology already exists for creating TASes for older consoles, but I don’t think anything like this exists for the Wii U. Maybe there’s something possible in Cemu. I’m not sure.
The whole point I’m trying to make here is that TAS creators should be celebrated for the artwork they’ve created. It was very naïve of me to think that I could just jump right in and do something like this with no prior experience. It’s like staring at the Mona Lisa as a complete beginner and thinking “Hey, I could do that.”
I pretty much just gave up. I simply wasn’t talented enough at Super Mario Maker to figure out the correct button inputs for such a complicated level. I was able to inconsistently make my TAS get past the first plant and onto the second one at least. I considered that a small win.
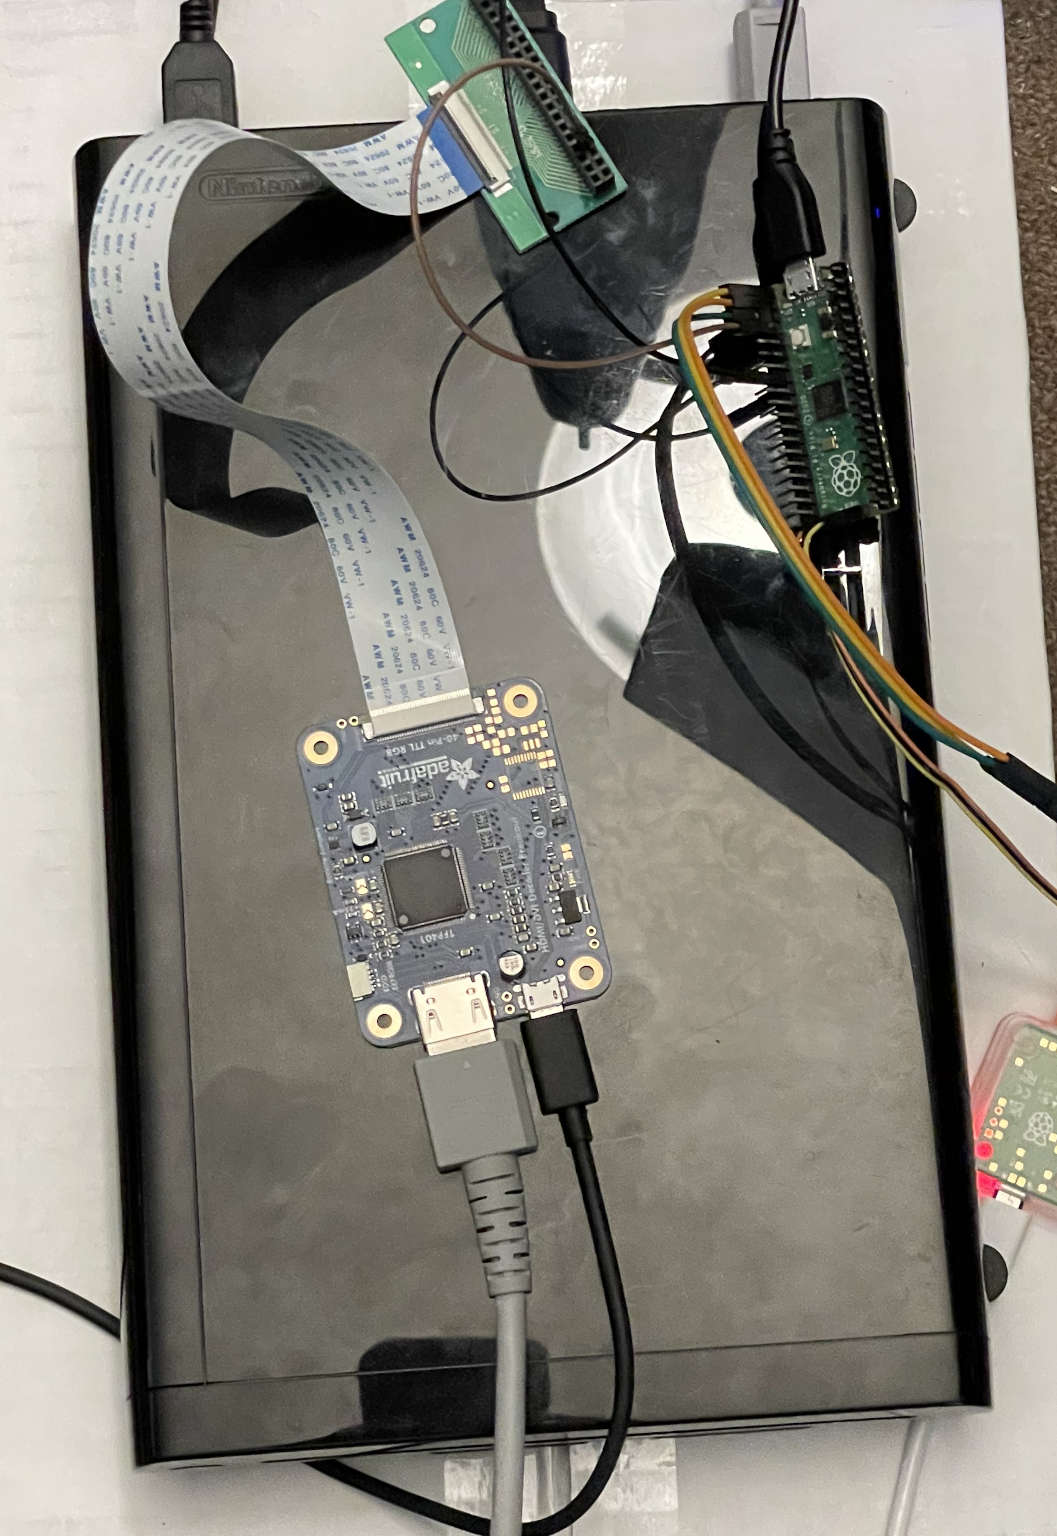
Then someone suggested that maybe I should try a smarter approach than a timer. I had thought about this too, but didn’t bother trying until another person brought it up. For try 2, I ordered a TFP401 breakout board from Adafruit. The TFP401 is a chip made by TI that decodes DVI into a parallel video signal. If you’re an avid reader of my blog, it serves a similar purpose to the ITE IT6802E from my last HDMI capture card repair adventure. DVI isn’t exactly the same thing as HDMI, but it’s close enough. My theory was I could use the vertical sync (VSYNC) output from the TFP401 as a GPIO interrupt trigger. It pulses once per frame, so by detecting that pulse I could change my pressed button state perfectly in sync with the Wii U’s video signal.
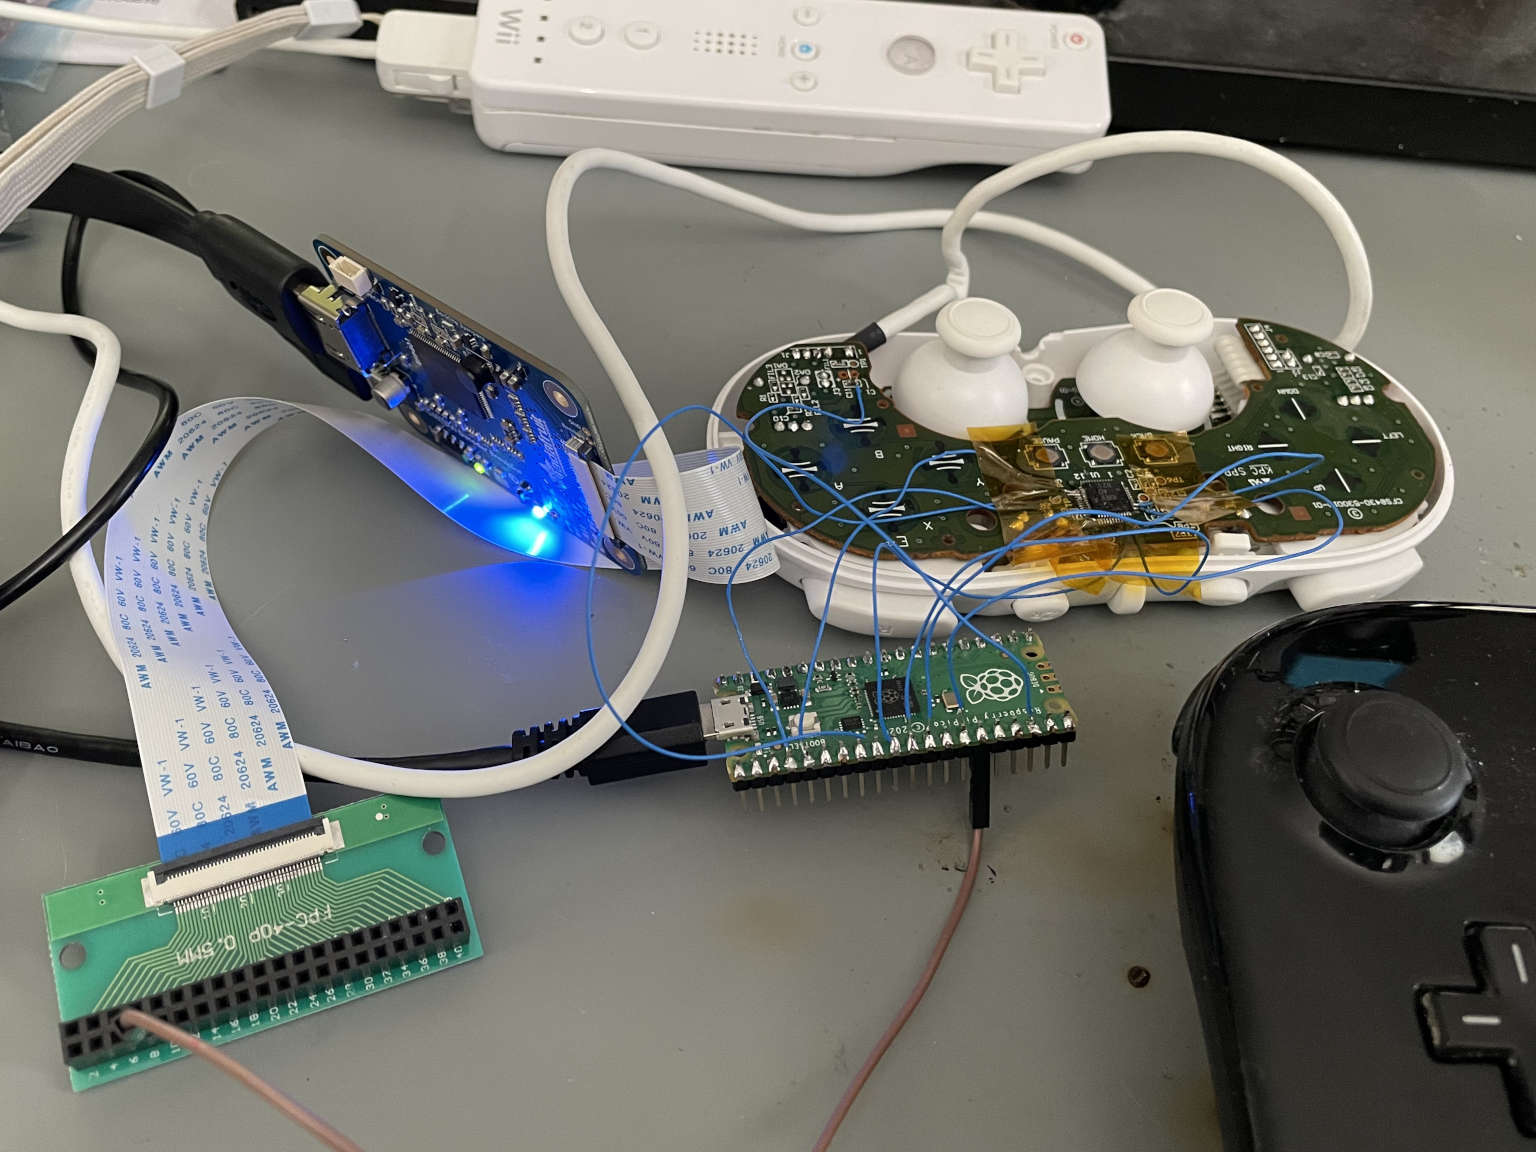
By the way, this picture also makes it clear that although the Wii Classic Controller has a wire coming out of it, it really just goes into the Wiimote. So the entire setup ends up being wireless between the controller and the Wii U console.
I tweaked my code to use a GPIO interrupt instead of a 60 Hz timer and tried it again. Was this going to be the magic solution that would suddenly make my button control repeatable and reliable?
Nope!
I got exactly the same results I saw with my 60 Hz timer. Identical button inputs often gave me different results. I even tried introducing a constant delay after each interrupt, so that I wouldn’t be changing the inputs right when the frame was also changing. It didn’t matter.
I wondered if maybe MicroPython wasn’t doing a great job with timing, but it’s not like servicing a 60 Hz (well, 59.94 Hz to be exact) interrupt is super duper hard to do with a 125 MHz RP2040. I was pretty sure coding it in another language wouldn’t change a thing. I performed an eye-opening test, which was to simply press the A button for a single frame, then wait for a short time, over and over again. Sometimes Mario wouldn’t jump. Something was eating my presses. Here’s an oscilloscope trace. The yellow line is vsync, showing a pulse every frame. The blue line is the A button signal.
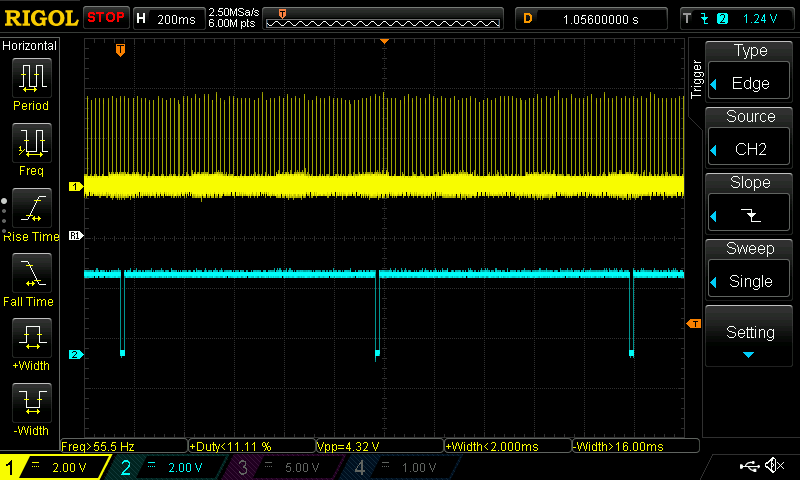
Every time I pressed the button for exactly one frame by driving the A button signal low, I expected to see Mario briefly jump. But it didn’t always happen. In this trace, the first two presses were fine and caused a jump, but nothing happened in response to the third one. I also saw this same behavior when I changed it to press the button for two frames instead of one. The longer I pressed the button, the less likely an input would be lost though.
That was the end of my attempts to try to trim the herbs with my own TAS. I realized that I had created a nifty hardware platform for testing things out though, so I reached out to dwangoAC (keeper of TASBot) just in case the TASBot team had any use for it. He let me know that the TASBot community was also looking into it with a slightly different approach and invited me to join their Discord to discuss further.
When I joined the Discord, I found out that the TASBot people were working on their own solution, cleaner than mine — they were trying to do it without modifying any controller hardware. Since the wireless controllers just talk over Bluetooth, the idea was to pretend to be a Wiimote.
Additionally, I saw that Ahoyo had already given the TASBot team his original button press sequence for Trimming the Herbs. I was also delighted to find out that Ahoyo had seen the exact same problem I was facing: the button presses weren’t 100% reliable. It wasn’t just a matter of playing the TAS once and beating the level. You had to try over and over again until the stars aligned and everything stayed in sync just right.
I downloaded his CSV file containing the button press timings and converted them into a format that could be pasted into an array of actions in my code. I had to experiment in order to figure out the starting delay. What I mean by that is the delay between pressing “Start Over” and the level actually restarting. It seemed to be somewhat variable, and I just had to play with changing how long I waited until I found something that mostly worked.
I didn’t do a great job of tracking exactly how many tries it took me, but after something like 50-100 attempts, my code combined with Ahoyo’s inputs beat the level.
That’s right! My completely stock Wii U, combined with a hacked controller on which I could electronically press buttons, cleared Trimming the Herbs. The success rate wasn’t great, but I was able to make it work. Here’s a video showing 3 successes in 10 minutes of tries. You can see the input inconsistency. It fails in random locations:
Obviously this wouldn’t count as a legitimate clear of the level from the perspective of Team 0% since I was just playing back the TAS. But that wasn’t the point. The point was to prove the concept and show that the CSV of button presses provided by Ahoyo was indeed the real thing. And most importantly, to have some fun with this project.
This whole accomplishment brought up some interesting concerns though. If precisely pressing the A button for exactly 1 frame doesn’t always cause Mario to jump, doesn’t that mean that a human player’s inputs aren’t always getting through immediately either? And what causes this to happen?
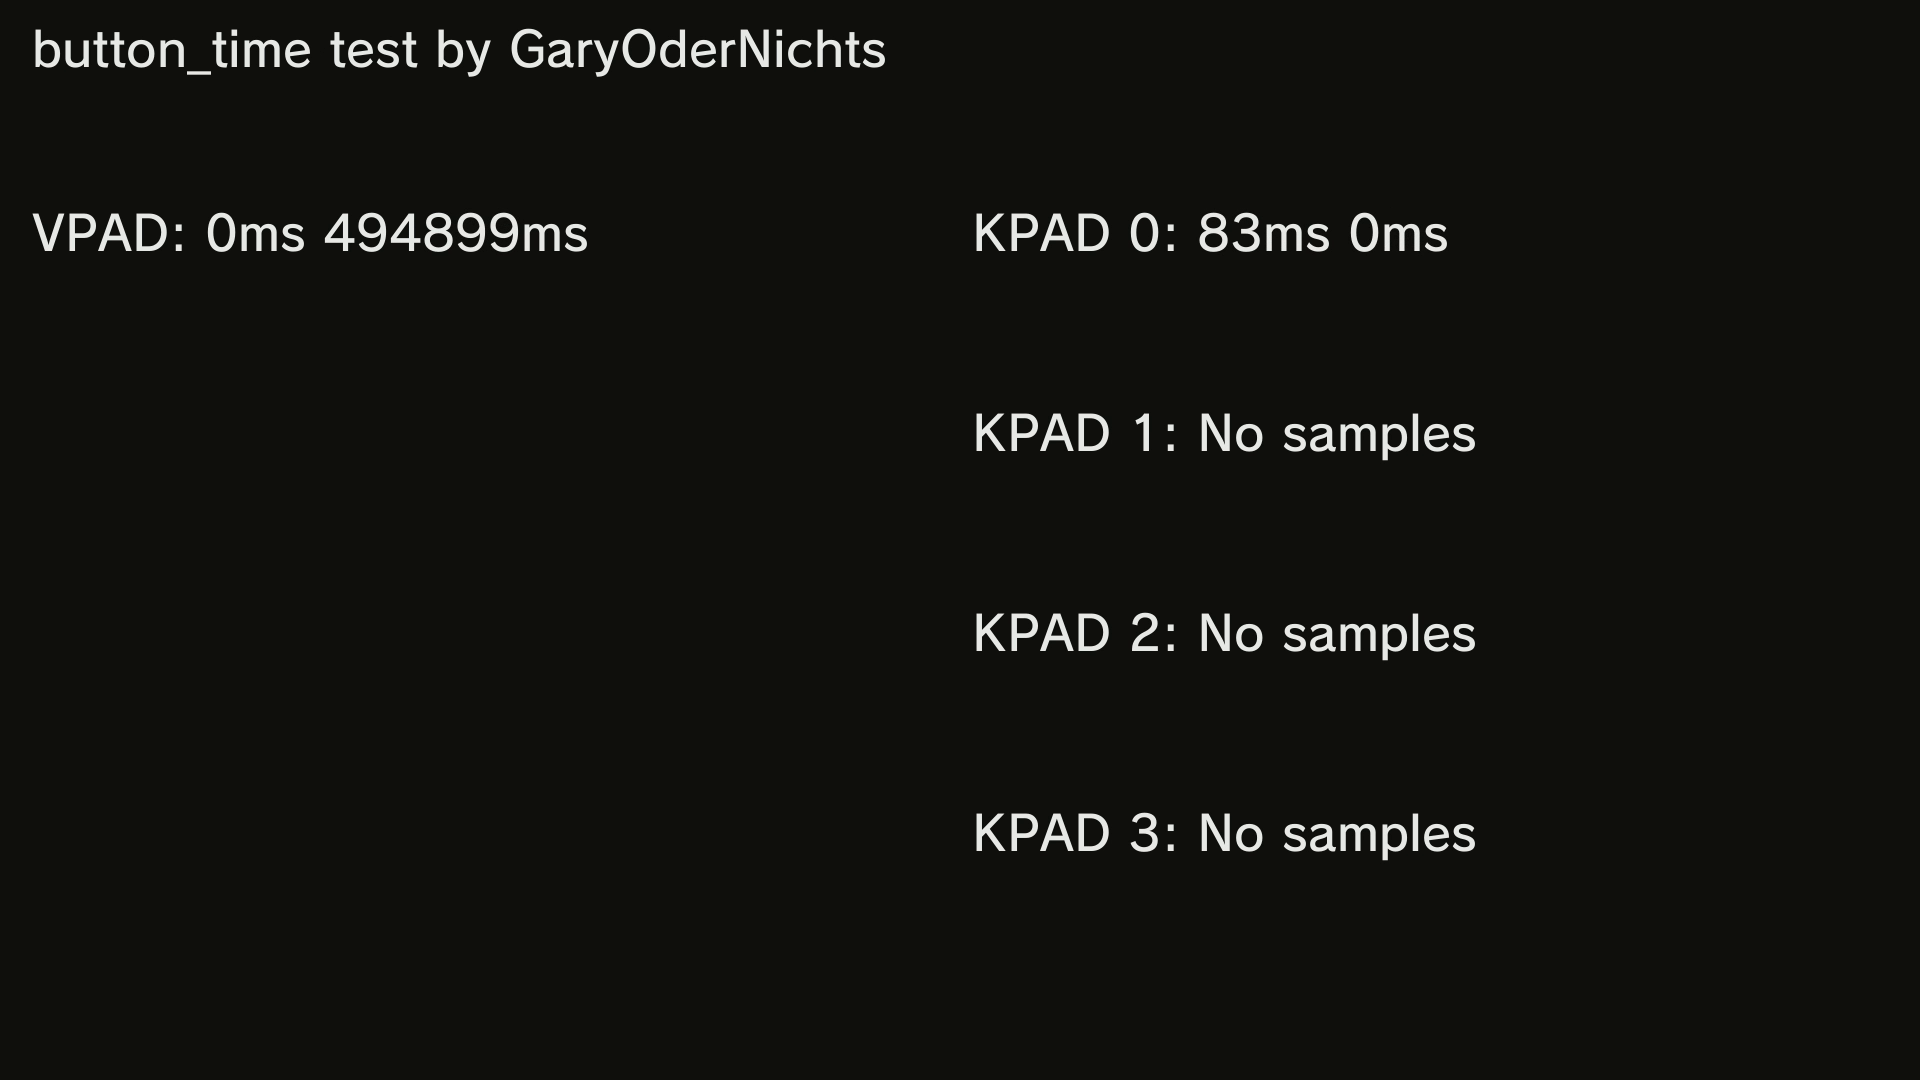
These are some of the questions that the TASBot team was also looking into. I participated in some of their research. They wanted to handle it more scientifically, which makes perfect sense. GaryOderNichts created a tool for measuring the timing from the Wii U’s perspective between successive button presses and other members of the TASBot community further tweaked it to record timing data to a CSV file on an SD card. I had to use Aroma in order to run it, which required running a browser exploit to temporarily allow my Wii U to run custom apps. No worries, though — as soon as I rebooted everything would go right back to stock.
Based on all of my eyeball tests, I wasn’t exactly shocked when the hard data also showed that the Wii U was struggling with timing. At the request of others, I set up my Pi Pico to press the A button for 3 frames, then release for 3 frames, and repeat a whole bunch of times. In a perfect world at 59.94 Hz, this would mean I should expect to see 6 frames = about 100 milliseconds between each press. Clearly the Wii U is not operating in a perfect world though: in addition to good readings of 100 (which dominated the results), I also saw 66, 83, 116, and 133. That’s right, my presses were off by up to two frames during this test.
For anyone trying to perform a bunch of frame-perfect tricks to beat an insanely difficult level, that’s pretty bad! I also noticed that the further away I moved the Wiimote away from the console, the worse it got. At 10 feet away through a couch, I saw a lot more non-100 readings than when it was 3 feet away. Not only that, I discovered that I had an incredibly difficult time playing back the TAS perfectly if I had the gamepad, Wiimote, and controller super close together so they could all be in the same frame for a video. When I tried to make a video showing a full successful TAS playback, it frustratingly took forever. I ended up having to move the Wiimote and gamepad further apart before I could get it to succeed.
That’s where I left off with this project in April, and it’s also where the Ars Technica articles and my original video ended. I didn’t know which part of the stack was to blame. Obviously with wireless devices, you can’t guarantee that every single packet you send out will arrive at the destination. That’s just the reality of how wireless protocols like Bluetooth work. If you’re in a busier RF environment, there’s less likelihood your packet makes it through. Quite simply, it’s physics. But what about retries?
Aside from that, the Wii U is running an OS. It’s not bare-metal code like the original Nintendo. How repeatable is the timing for a game to grab inputs from the received Bluetooth packets through the OS? And what about the Wiimote and controller? How often does the microcontroller in the Classic Controller sample the buttons? What does it do for debouncing? How often does the Wiimote read button info from the Classic Controller through I2C? There were so many question marks, and I didn’t really feel like investigating further at the time.
The fact that I got different results by physically moving the controller inferred that at least some of the blame could be attributed to the Wiimote’s wireless connection to the console. This was very concerning for the prospects of playing back a TAS on an unmodified Wii U in general because of the lack of wired controller options.
Fast forward half a year. I decided to revisit everything in more depth. I wanted to gain a better understanding of what was responsible for the timing variability. To do this, I approached the problem from a new angle: entirely removing wireless communication from the equation. That’s easier said than done though. To my knowledge, there aren’t any wired gamepads compatible with Super Mario Maker. There are USB GameCube controller adapters for the Wii U, but they only work with games specifically designed for them like Super Smash Bros.
I searched around and discovered that the Wii U homebrew community has created some amazing tools. Maschell created one such tool called HID to VPAD, which allows you to use a USB game controller on the Wii U. It patches the system so that it thinks a Wii U Pro Controller is connected, and passes through the USB controller’s button presses as though they came from the Pro Controller. It has way more functionality than I’m describing here, but this was exactly what I needed.
Knowing this existed, I felt like I had a path forward. The game plan was to use a Raspberry Pi Pico again, but this time, I would have it pretend to be a USB human interface device (HID) gamepad. By sending it a command through a UART, I could instruct it to perfectly play back the button presses for beating Trimming the Herbs. This would potentially provide the community with a new data point: how repeatable is TAS playback in Mario Maker on the Wii U if you completely bypass the Classic Controller, Wiimote, and Bluetooth link?
It was pretty simple to code something up on the Pico. I just started from the Raspberry Pi Pico examples and modified usb/device/dev_hid_composite for my needs. I created keystrokes I could send through the serial port for pressing and releasing buttons, playing back the TAS with a simple frame timer, and canceling playback if something went wrong. Pretty soon, I was ready to try something out.
It took me a while to figure out how to use HID to VPAD. It’s old (the latest release was in 2018) and isn’t supported by Aroma, so I played around and figured out how to load it with Tiramisu. In order to run Tiramisu you need to use an exploit. The same browser exploit that I used earlier with Aroma works great, or if the Wii U isn’t connected to the internet, you can also use UDPIH or bluubomb instead. I also had to create a config file for my gamepad, but that was easy with the help of HID-TEST, also by Maschell.
I decided to start with a simple copy of Trimming the Herbs with a door added so that I could guarantee that everything would start out in sync. Then I played back Ahoyo’s controller inputs with this new setup.
It beat the level instantly on the first try as soon as I got the timing of the first jump correct. All of the inputs played back perfectly! I had never seen that happen with the Bluetooth controls. It always took multiple tries before it would succeed.
I kept playing it back. I did see it fail a few times, so it wasn’t a 100% robust solution, but it almost always beat the level. This was clearly much better performance than what I saw with my ugly Classic Controller hardware hack. It wasn’t regularly dropping or delaying inputs. Here’s a five-minute video (using my custom version of the level with a sync door) where you can see a bunch of successes and one failure.
This was very, very exciting! It seemed to be evidence that the Wii U’s operating system is definitely capable of handling higher-precision timing. I felt like this pushed the blame more toward the Classic Controller’s firmware, Wiimote’s firmware, or (most likely) the wireless communication.
I wasn’t happy with the failures though. It was succeeding 90% of the time or more, but that wasn’t good enough. Theoretically it should have succeeded every time if my Raspberry Pi Pico TAS playback code was pressing the buttons perfectly. I was still using a “dumb” frame timer instead of inspecting the Wii U’s vertical sync signal though, so I grabbed my TFP401 HDMI breakout board from the previous Wiimote experimentation and wired it up to my new USB controller. This resulted in the following monstrosity of boards wired together:
After quickly changing my code to use a GPIO interrupt for frame counting, and then bashing my head against the wall for 20 minutes when it didn’t work, I finally realized I didn’t plug power into the HDMI breakout board. I fixed that slight oversight and tried it out. All I can say is: ever since I hooked up the VSYNC signal to inspect the Wii U’s HDMI output, I’ve never seen my USB controller playback device fail to beat Trimming the Herbs. Does that mean it’s perfect? Not necessarily. After all, Trimming the Herbs is a short level. But after repeated attempts, I feel great about this solution. You definitely don’t have to watch the whole thing, but here’s a video showing the full process of using the bluubomb exploit to run Tiramisu, patching in USB gamepad support with HIDtoVPAD, and then perfectly clearing Ahoyo’s original Trimming the Herbs level 39 times in a row.
You may notice that in this video I was back to using the original level rather than my modified version with a door. That’s because I very quickly became confident that everything was staying in sync, so I switched back to testing with Ahoyo’s original level, which I downloaded before the Wii U’s online service was shut down in April. Once I got the timing figured out for how many frames I needed to wait after pressing Start Over, it worked perfectly every time. I’ve never seen it fail ever since I started using the HDMI vertical sync signal to count frames, even after hundreds of plays.
I even created (well, copied) a new level called Trimming Everybody’s Herbs which basically is just three repetitions of Ahoyo’s original Trimming the Herbs, making it even more difficult to beat by anything other than a TAS replayer. Here’s a short video of my Raspberry Pi Pico playing back the inputs over USB to clear it:
The level gets more and more naked as time goes on, especially by the third repetition, but I promise it’s not laziness on my part: it’s due to limits on how many course elements I can put into a single level.
I did notice something interesting during my experimentation with Trimming Everybody’s Herbs. It’s a bigger level. The number of frames that elapse between when I press Start Over and the level begins actually varies. The delay doesn’t seem to be based on frames, because sometimes (but not always) I need to wait one more frame if I start over while standing in front of the final door. The delay seems to be consistently the same when I start over from the beginning of the level though. It’s like Super Mario Maker takes a tiny bit of extra time to load the data at the start of the level if it isn’t already there. I can work around this by starting over twice whenever I want to play back the level. It might also be possible to look at the HDMI picture data to sync up with the first actual frame of playback, but that would probably be very tricky to do with a 1080p video frame and only a microcontroller.
With these results, it’s looking like we can eliminate the Wii U’s operating system and Mario Maker itself as sources for the terrible input inconsistency I originally observed. When the console is allowed to use a wired USB controller, it can very reliably handle frame-perfect inputs, at least in short bursts. The problem is further down the line.
Since the TASBot team saw similar issues with their own Bluetooth controller emulation, I’m tempted to guess that the firmware in the Wiimote and Classic Controller are probably not the problem. And remember, the reliability changed based on where I physically positioned all of these devices communicating wirelessly. I think what it boils down to is wireless controllers, at least on the Wii U, can’t be trusted if you depend on precise input timing.
I’m sure there are ways to further narrow it down. You could try to do your testing inside a huge Faraday cage test chamber to get a totally clean RF environment, if you are lucky enough to have access to one. It might also be interesting to try pairing a Wiimote to a PC, pressing the buttons at precise times using a hardware hack like what I did originally, and doing a similar analysis to see how consistently the inputs are received by the PC. That might help narrow down whether it’s the communication itself, the Wiimote’s Bluetooth implementation, or something about the Wii U’s Bluetooth stack that’s at fault. I’m very inexperienced with Bluetooth though. I’d be curious if any experts out there might be able to chime in with their thoughts. Is this pretty normal to expect with Bluetooth controllers, or did Nintendo make a mistake?
Another idea would be to find some other wireless controllers that use a USB dongle and do the same kind of hardware hack I did to the Classic Controller, while also performing the Wii U software hack to allow USB controllers to work. A test like this might help narrow down whether the issue is something specific to Nintendo’s implementation or just wireless controllers in general. I feel like if all wireless controllers were really this bad, pro gamers worldwide would be revolting. The Bluetooth HID spec version 1.0 from 2003 even talks about the importance of low latency and mentions that the implementation of the Bluetooth link should add no more than 5 ms of additional latency. It specifically mentions that gaming requires latency low enough to respond correctly on a frame-by-frame basis with 60 Hz video. Maybe that’s in a perfect world with no dropped packets? I don’t know. My testing was inside of a room with other Wi-Fi devices also talking on the 2.4 GHz spectrum, so definitely not a perfect world.
This opens up even more questions. Is this new USB control method reliable over long periods? The longest TAS I’ve played back is my copy of the level with three repetitions, so only about 45 seconds or so. Are all Bluetooth controllers as bad as what I saw with the Wiimote and Classic Controller? The truth is, though, I’m out of energy and motivation to go any further on this. Hopefully if there is more interest in diving deeper, others can use this research as a starting point.
There are a couple of things I want to say before I end this post. First off, it was very impressive that Ahoyo was able to create Trimming the Herbs in the first place. Making a TAS in this environment takes a serious amount of skill. I also don’t want to forget about Sanyx. What Sanyx was able to pull off by clearing the level as a human before Nintendo’s shutdown was amazing. Who knows how many times Sanyx pressed the buttons perfectly, but the inputs were delayed or lost for whatever reason?
I hate to use the word “never”, but I really don’t think it will ever be possible to play back a TAS on a completely unmodified Wii U, at least in games that don’t have native support for wired controllers. If it happens, it will require some kind of exploit or arbitrary code execution to enable a more reliable input method. The wireless communication is just too unreliable. You’d never be able to trust it, especially in an environment where you have no control over what’s happening on the 2.4 GHz frequency used by Bluetooth and Wi-Fi.
To paraphrase one of the commenters on the final Ars Technica article in the series, I guess what it comes down to is: at least on the Nintendo Wii U, there may actually be some truth behind blaming your controller when you lose!
It has recently come to my attention that this USB controller solution is a bit silly and overcomplicated — there’s no need to involve a Raspberry Pi Pico pretending to be a USB gamepad if you have the ability to run arbitrary code. You could just directly load a TAS player and spoof the perfect controller inputs at that level. This starts to veer way outside of my knowledge level though, so my USB controller hack was the best I could throw together on my own building upon the tools already available out there!
Speaking of that, I would like to thank the entire Wii U mod community for what they’ve done to allow this research to happen in the first place. I never would have been able to do any of this fun experimentation without the existence of incredible tools by people such as Maschell, GaryOderNichts, and countless others who have put so much work into hacking the Wii U. It’s extremely impressive what they have accomplished!
If you missed when I linked it earlier and are interested in checking it out, here’s my GitHub repository with all of the code I wrote for playing back the TAS. I would be lying if I said it was super complicated or fancy though! It’s essentially just an interrupt handler that steps through a list of actions. Enjoy!


no comments